| |
| |
| |
How to easily store and manage images in MySQL database |
| |
| I suppose that xampp is installed, if not see how to install it. |
| |
Step 1: |
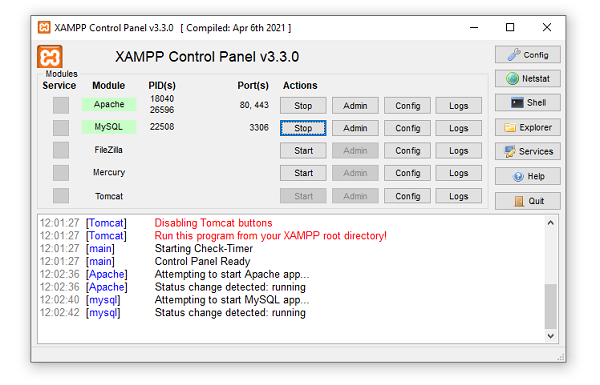
| Launch Xampp and start both Apache and Mysql |
| |
 |
| | | |
Step 2: |
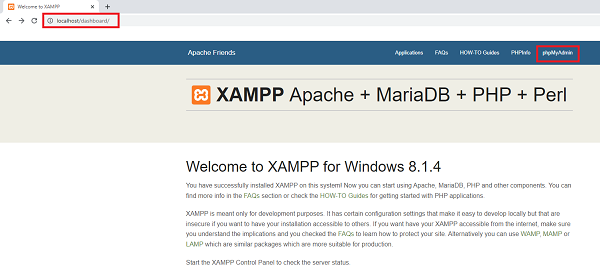
| Open your browser and type http://localhost |
| |
 |
| | | |
Step 3: |
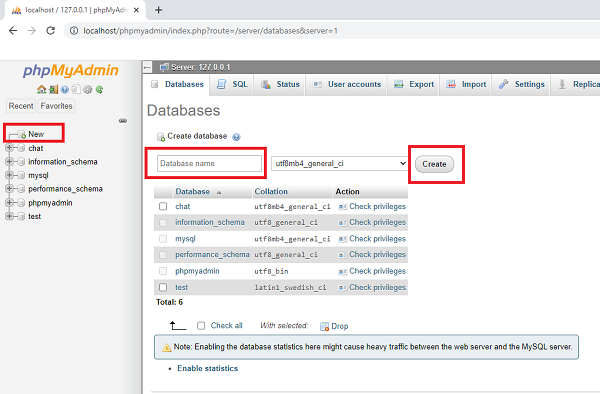
| Open phpMyAdmin and create the database, in my case it is called dzosoft |
| |
 |
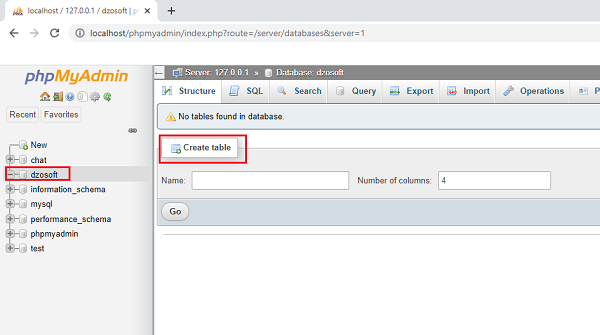
| | | and then we create the images table with its columns id, name, content , type and size |
| |
 |
| | | |
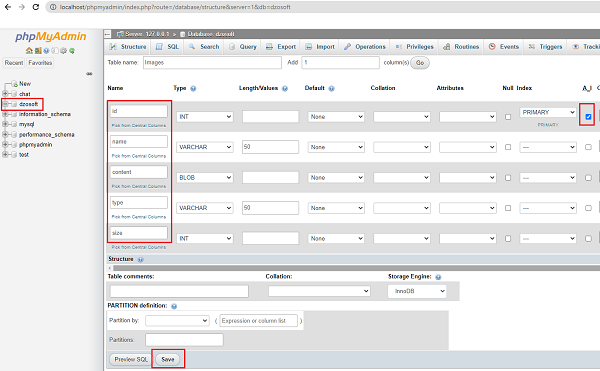 |
| | | You could also create the table by running the following sql script: |
CREATE TABLE `images` (
`id` int(11) NOT NULL AUTO_INCREMENT,
`name` varchar(50) NOT NULL,
`content` blob NOT NULL,
`type` varchar(50) NOT NULL,
`size` int(11) NOT NULL,
PRIMARY KEY (`id`)
) ENGINE=InnoDB AUTO_INCREMENT=158 DEFAULT CHARSET=utf8mb4;
|
|
| |
Step 4: |
| We need to three files: index.html, image.js,image.css, and addImage.php |
| Download code |
|
| |
index.html |
| |
<html>
<head>
<meta charset="utf-8">
<meta http-equiv="Content-Type" content="text/html; charset=utf-8" />
<link rel="icon" href="image/favicon.png" type="image/png" />
<title>How to store image in MySQL database</title>
<link href="image.css" rel="stylesheet" media="screen">
<script type="text/javascript" src="image.js"></script>
</head>
<body>
<input type="hidden" name="paramimage">
<input type="hidden" name="MAX_FILE_SIZE" value="2000000">
<input type="file" id="imagefile" name="imagefile" style="display: none"
onChange="HandleChange();"/>
<input type="text" id="filename" readonly="true" style="display: none"/>
<a class="button-image" onclick="HandleBrowseClick();">Select Image</a>
<a class="button-image" onclick="transferImage();">Upload</a>
<div id="divImage"></div>
</body>
</html>
|
.button-image
{
position: relative;
padding: 3px 5px;
margin: 0px 5px 5px 0px;
border-radius: 10px;
color: #000;
text-decoration: none;
border: 2px solid #e6e600;
background-image: linear-gradient(to bottom, #fff,#fff);
font-family: arial,verdana,helvetica,sans-serif;
font-size:14px;
cursor: pointer;
cursor: hand;
}
.button-image:active
{
transform: translate(0px,5px);
-webkit-transform: translate(0px,5px);
border:none;
background-image: linear-gradient(to bottom, #e6e600, #e6e600);
}
.button-image:hover
{
color:#fff;
background-image: linear-gradient(to bottom, #e6e600, #e6e600);
-webkit-box-shadow:3px 3px 2px #c0c0c0;
box-shadow:2px 2px 2px #c0c0c0;
}
|
function transferImage()
{
var imagefile= document.getElementById("imagefile").files[0];
var formdata = new FormData();
formdata.append("imagefile", imagefile);
sendData(formdata,"addImage.php",0,"divImage");
}
function HandleBrowseClick() //To load Image
{
var fileinput = document.getElementById("imagefile");
fileinput.click();
}
function HandleChange()
{
var fileinput = document.getElementById("imagefile");
var textinput = document.getElementById("filename");
textinput.value = fileinput.value;
}
function sendData(data,action,header,divinnerHtml)
{
var location = window.location;
var xhr;
if (window.XMLHttpRequest)
{
// Mozilla, Safari, ...
xhr = new XMLHttpRequest();
}
else if (window.ActiveXObject)
{
// IE 8 and older
xhr = new ActiveXObject("Microsoft.XMLHTTP");
}
if (xhr)
{
xhr.open("POST", action, true);
if(header==1)
{
xhr.setRequestHeader("Content-Type", "application/x-www-form-urlencoded;text/html; charset=utf-8");
}
xhr.send(data);
xhr.onreadystatechange = display_data;
}
else
{
alert('Sorry, your browser does not support this.;');
}
function display_data()
{
if (xhr.readyState == 4)
{
if (xhr.status == 200)
{
if(divinnerHtml=="")
{
document.getElementById(divinnerHtml).innerHTML = document.getElementById(divinnerHtml).innerHTML+ xhr.responseText;
return;
}
}
}
}
return;
}
|
<?php
if (!$con)
{
die("mysqli_init failed");
}
if(!mysqli_real_connect($con,"127.0.0.1","dzosoft","","root"))
{
die("Connect Error: " . mysqli_connect_error());
}
if(isset($_FILES['userfile']))
{
}
else
{
if(isset($_FILES['userfileUser']))
{
$fileName = $_FILES['userfileUser']['name'];
$tmpName = $_FILES['userfileUser']['tmp_name'];
$fileSize = $_FILES['userfileUser']['size'];
$fileType = $_FILES['userfileUser']['type'];
}
else
{
$msgerr="Overflow";
}
}
if($fileSize==0)
elseif ($fileSize>0)
{
if($fileSize>6400000)
{
$msgerr= "File !!";
}
else
{
$fp = fopen($tmpName, 'r');
$content = fread($fp, filesize($tmpName));
$content = addslashes($content);
fclose($fp);
$fileName = addslashes($fileName);
$query = "insert into images (name, size, type, content) " . "VALUES ('$fileName', '$fileSize', '$fileType', '$content')";
$retval = $con->query ( $query );
if (! $retval)
{
$msgerr= "Error execution query";
}
else
{
if(empty($msgerr))
{
$msgerr= "Image saved";
}
}
}
}
echo $html;
?>
|
|
| |
Step 5: |
| Copy all these files into the folder C:\xampp\htdocs\image_into_db |
|
| |
Step 6: |
| Open your browser and type http://localhost/image_into_db |
|
|
|
| Happy Coding! 😇 |


 EN
EN 
 Español - ES
  Français - FR


