| |
| |
| |
How to optimize image with gimp |
| |
| How to optimize an image for your website with GIMP
|
|
| In this tutorial I will show you how to optimize your images for the web with the free software GIMP.
|
|
| |
Step 1
|
|
| Let's assume that GIMP has been installed, if not download it here
|
|
|
|
|
| |
Step 2
|
| |
Determine the image size for your web page
|
| |
| The first manipulation will consist in resizing the image to the dimensions adapted to your web page.
|
| It is indeed useless to integrate an image of 2000px wide to then display it on 200 pixels in your page
|
|
| If you have no idea what dimensions you need to set your image to,
|
| Insert your image into your page without sizing it and do some tests by sizing your image in HTML as
|
| in the example below:
|
<img src="picture.jpg" width="300px">
|
| It is then enough to vary the value of width until you have the desired result,
|
| You will know the display width of your image.
|
|
| You can also experiment with the height attribute, but be careful not to put a value for the height
|
| and a value for the width at the same time because in this case you could distort the image.
|
|
| |
Step 3
|
|
| |
Resize your image
|
| |
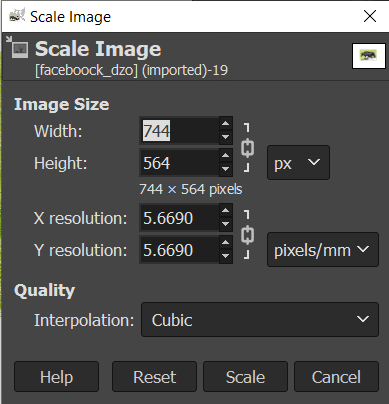
| Now that you know the width you want for your image, just open your image in GIMP, then go to
|
| the Image menu --> Image Scale and Image Size, in the window that opens, enter the desired width
|
| or height then validate with the Scale button.
|
| |
 |
| | |
| |
Step 4
|
| |
Export the image for web
|
| |
|
| The image is ready, it must now be exported in a format suitable for the web.
|
| The main formats used for the web are .png, .jpg or .gif.
|
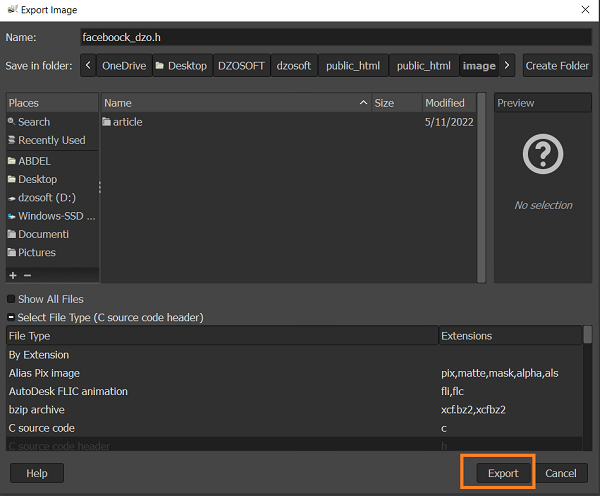
| To export your image, click on the File / Export As menu. In the window that opens, click on the arrow
|
| in front of the text Select file type, then choose the export format you want
|
| to use and click on Export.
|
| |
 |
| | |
| A window containing the parameters corresponding to the selected format will then be displayed
|
|
| |
jpg Format
|
| |
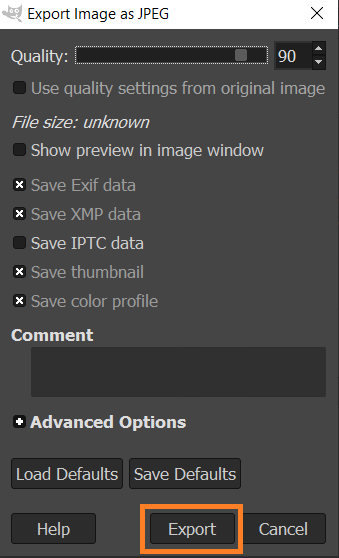
| If you choose the .jpg format, you will be able to determine the compression rate of your image.
|
| Before playing with the Quality slider, check the Show preview in image window box so you can see
|
| the effects of compression on the final result.
|
| Adapt the quality of your image to your liking while observing the indication on the file size which varies.
|
| When you are satisfied with the result, you can click on Export.
|
|
| |
 |
| | |
| |
png Format
|
| |
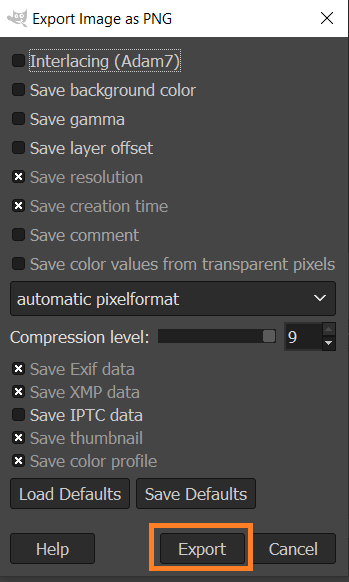
| If you export your file as .png, always use maximum compression.
|
| Compression will have no effect on image quality or display time, only the duration of the export.
|
| |
 |
| |


 EN
EN 
 Español - ES
  Français - FR


