| |
| |
| |
How to turn a photo into a drawing in Photoshop |
| |
|
| |
 |
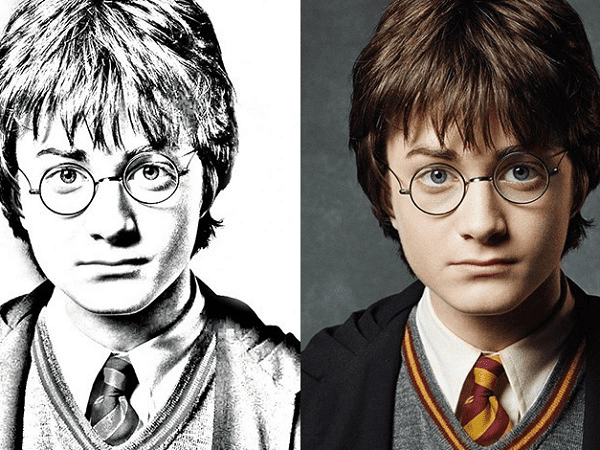
| | | You can easily turn a photo into a drawing on Photoshop: use the pencil and the Gaussian blur filter، or the high pass filter.
|
|
| Ways to Turn a Photo into a Pencil Drawing Using Photoshop
|
| |
Gaussian blur for a black and white drawing
|
| |
|
| Open the image to be transformed in Photoshop and place it on a new layer, using copy-paste or keyboard shortcuts: ctrl+e
|
| on PC or cmd+e on Mac.
|
| Create a "Hue/Saturation" adjustment layer and lower the saturation to -100, which turns the photo into black and white.
|
|
| Select the layer below and choose the blending mode "Lighten" - "Color Density". Switch the layer to negative, using the
|
| keyboard shortcuts “ctrl+i” on PC, “cmd+i” on Mac. The image turns white.
|
|
| Select the “Gaussian Blur” (“Filter” > “Attenuation”) to bring out the edges. Play with the settings to highlight
|
| the details which, depending on their aspect, will help you make a drawing appear.
|
| |
Finishes
|
| |
| Create a "Levels" adjustment layer and move the sliders to force the density of the strokes.
|
|
| Parts may need to be cleaned. Again, two methods. Either you use a new layer to place above using the shortcuts
|
| "ctrl+shift+alt+e" on PC, "cmd+shift+alt+e" on Mac. The areas to be cleaned can be painted white with the spray,
|
| which keeps your bottom layer intact. Otherwise, even simpler, you select your layer and apply the negative
|
| to repaint in white. Pass a white brush with a gradient edge to make the outlines disappear, the grain of
|
| the image and/or reduce the area density.
|
|
| |
High pass method: a drawing in colored pencils
|
| |
|
| Open your photo, preferably with a simplified or cropped background, in Photoshop. Duplicate your layer.
|
|
| Work on the high pass filter on the second layer (in "Filter" > "Miscellaneous") to adjust the sharpness
|
| of the image. For a solid line effect, neither too soft nor too strong, choose the value 8.7. Duplicate it.
|
|
| Display the negative of the third layer, by selecting it and using the shortcuts: "ctrl+i" on PC or "cmd+i" on Mac.
|
|
| Select the "Division" mode on layer 3, which should reveal a pencil effect. Merge layers 2 and 3 by selecting
|
| them and using the following shortcuts: "ctrl+e" on PC and "cmd+e" on Mac. The colors and lines should intensify.
|
|
| |
The next step to turn a photo into a drawing in Photoshop
|
| |
|
| Change the levels to intensify the details. Select the merged layer (4) and use the shortcuts ctrl+l on PC or cmd+l on Mac.
|
| To bring out the dark tones in your drawing, use the left slider and move it to the first values of the histogram.
|
| Also move the Midtones slider to the right.
|
|
| Duplicate the original layer and put it in the first position. To soften the details and gain visibility,
|
| we use the “Surface Blur” filter (“Filter”>“Blur”). Vary the values there, depending on the image,
|
| with a radius around 15 and a threshold around 35.
|
|
| To recover the colors of layer 4, we will perform a new merge. Choose a "Hard Light" or "Linear Light"
|
| depending on the desired effect.
|
|


 EN
EN 
 Español - ES
  Français - FR


